

Grocery planogram compliance means checking whether products on a store shelf match the approved layout: the right items, in the right positions, with the intended number of facings. A useful check also records which plan version applies and any approved exceptions for that store.
A shelf can look full and still have the wrong products in the wrong spaces. It can also have an empty position even though the team has followed the layout correctly, because the product has not arrived. Those situations need different follow-up.
This guide explains how to check a grocery bay, record deviations and verify corrections across stores. The aim is to give store teams clear instructions and give managers enough evidence to decide what happens next.
What planogram compliance covers
A planogram is a layout showing how products should be arranged within a fixture or shelf section. A facing is one product front visible to the shopper; three units placed side by side create three facings, while units behind them add depth.
Planogram compliance connects the approved layout with what the store has actually set up. It is one part of grocery store operations, alongside replenishment, pricing, cleaning and other routines.
Keep the planning and execution jobs distinct. Oracle’s assortment and space planning documentation describes arranging assortments on virtual planograms, including placement and facings. A store compliance check asks whether the applicable plan has been implemented, and what prevented it if it has not.
The category or space-planning team owns the approved shelf layout. Store teams implement it and report local constraints. An area manager or designated reviewer checks the result. Agree on who can approve a deviation so an improvised shelf arrangement does not quietly become the next store’s reference.
Check the plan before checking the shelf
Start with the store, aisle, bay and version of the plan. A small-format store may use a different layout from a larger branch, and a shelf reset can leave teams working from different revisions if the effective date is unclear.
Give the store the product identifiers, pack sizes, fixture dimensions and expected facings it needs to interpret the layout. A similar-looking package is not necessarily the correct item. When the description is ambiguous, use the retailer’s item number or GTIN to distinguish it.
Product data matters here. GS1 Canada describes standardized product images and packaging dimensions as inputs to accurate planograms. Its guidance also highlights the importance of keeping changed packaging data available to trading partners. If a new pack no longer fits the planned space, the store needs a route to report the mismatch.
Before launching the check, confirm:
The correct plan version and effective date for the store.
The aisle, fixture and bay to which it applies.
Product identifiers and pack sizes for similar items.
Expected positions, facings and any relevant shelf-spacing instructions.
Approved local exceptions, with the person who authorized them.
The deadline and the evidence the reviewer needs.
For a reset, use an assigned task to communicate the work. A later audit can examine whether the arrangement has been maintained. This keeps the original implementation separate from the recurring review of store standards.
What to inspect in a grocery bay
Walk the shelf in a consistent direction, such as left to right and top to bottom. Compare what you see with the applicable plan rather than relying on whether the display looks tidy.
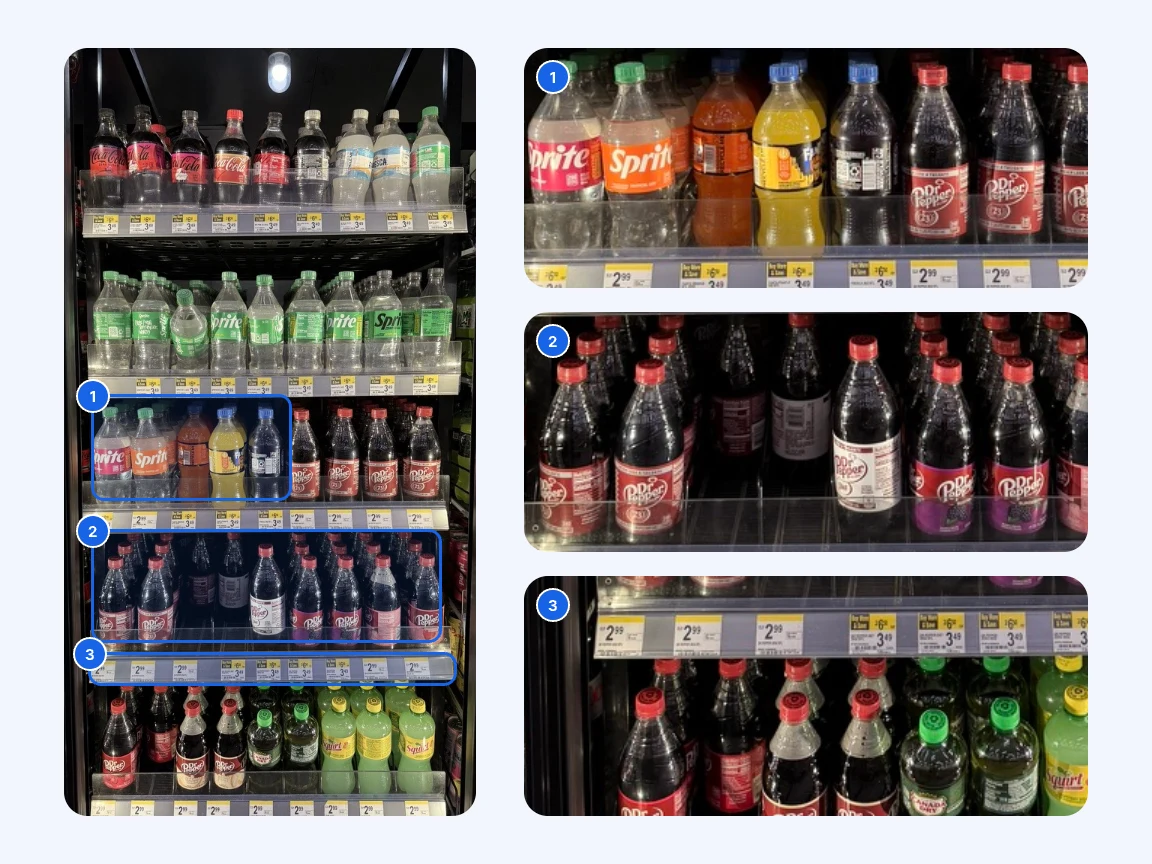
In the cooler photo, pin 1 shows different products mixed in one row, pin 2 shows uneven facings and pin 3 shows the shelf-edge labels.
Shelf-edge labels and stock availability help explain what you find, but they are not interchangeable with layout compliance. Keep them as separate fields if you want to distinguish execution problems from replenishment or pricing issues.
For fresh or chilled departments, use the applicable departmental layout and operating procedures. A planogram check does not replace food-safety, stock-rotation or temperature controls.
Record why the shelf differs
“Non-compliant” is not enough for the next person to act. Record the observed difference first, then distinguish a confirmed cause from something the store still needs to investigate.
| Finding | Next question |
|---|---|
| Wrong item in the space | Was it misplaced or substituted? |
| Too few facings | Is stock available, or is the space wrong? |
| Empty assigned position | Is the item missing from the shelf or the store? |
| Product does not fit | Are the pack and fixture dimensions current? |
| Different local layout | Who approved it, and until when? |
An empty position may indicate an on-shelf availability problem even when the assigned position has been preserved. If the retailer’s scoring rule counts that item as non-compliant, retain the availability reason alongside the result. Otherwise, the score alone can send the issue to the wrong owner.
Similarly, moving a neighbouring product into the gap may make the shelf look complete while hiding the missing line. Follow the retailer’s substitution policy and keep any approved temporary change visible in the record.
A four-step check and correction workflow
Use the same workflow across stores so the reviewer can follow a submission without reconstructing it from messages. Keep the instructions short enough for the colleague working at the shelf.
For multi-store resets, review submissions while there is still time to correct them before the launch deadline. Our promotion execution guide explains the wider process of briefing stores, collecting evidence and following up on corrections.
A worked example: a pasta and sauce bay
Imagine a store resetting a dry-goods bay. The plan calls for three facings of a 500 g pasta line and two facings of a tomato sauce. The supervisor finds two pasta facings, three sauce facings and an empty position for a second sauce variant. This is an illustrative example, not a customer result.
This produces two useful outcomes: a corrected arrangement and a separate record of the remaining availability issue. It also prevents a routine shelf correction from being treated as proof that every product is available.
If the store cannot fit the approved facings, ask it to record the actual fixture and pack dimensions. The planning team can then assess whether to revise the reference or approve a local variation, rather than repeatedly asking the store to reproduce an arrangement that does not fit.
Take photos that a reviewer can use
A full-bay photo helps the reviewer see the arrangement and its context. A closer view can establish product identity, a shelf-edge label or a particular gap. Choose the views to match the question being checked.
Ask the colleague to face the bay as squarely as possible, include its edges and avoid obscuring the shelf with a trolley. Where a bay is too wide for a readable image, use clearly identified overlapping sections. Capture close-ups only where the full view does not resolve the detail.
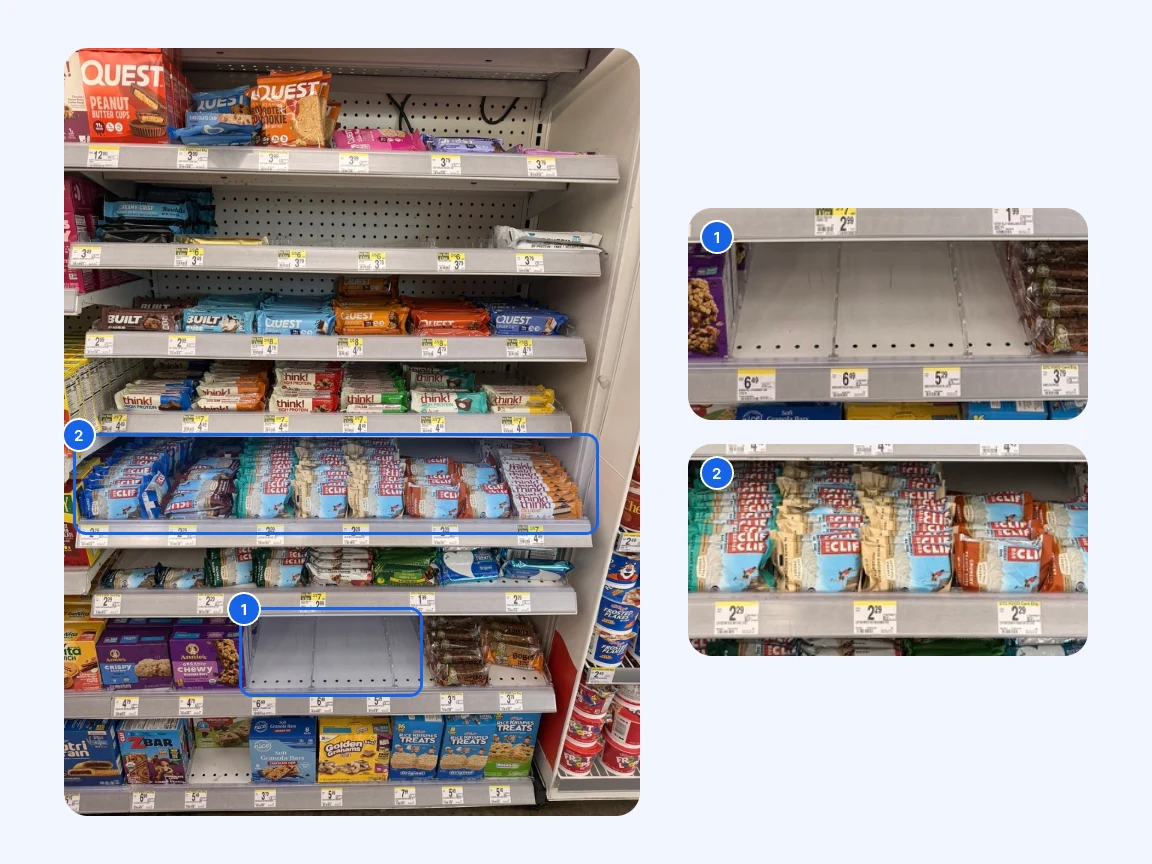
In the shelf photo, pin 1 shows an empty shelf position and pin 2 shows a fully stocked row.
A photo proves the visible condition at the time it was taken. Its usefulness depends on whether the relevant detail is visible and connected to the correct store, bay and task. It does not establish how much stock is behind the front row or in the backroom.
Keep feedback with the submission: name the shelf and product, explain the requested change and ask for the evidence needed to verify it. In Bitreport, photo verification is a review loop in which a reviewer can mark up the image and write feedback for the store, and AI checking can be switched on for eligible clients and industries. Do not confuse that workflow with automatic recognition of products or facings.
Measure compliance with a clear definition
Choose a unit of measurement before comparing stores. Product-position checks, individual facings and whole bays produce different percentages. Decide whether a product must match both its position and facing count to pass, then apply that rule consistently.
One simple internal measure is the share of assessed product-position checks that meet the defined rule:
Planogram compliance rate = (compliant assessed product-position checks ÷ all assessed product-position checks) × 100
For example, if 18 of 20 assessed checks meet that rule, the result is 90%. State the rule and sample alongside the number. This is an illustrative calculation, not a target or an industry benchmark.
Record missing evidence, unchecked positions and approved exceptions separately. Do not silently exclude difficult items to improve the rate. If two positions could not be assessed, report that coverage gap as well as the result for the assessed positions.
Track follow-up alongside the percentage: overdue corrections, repeated deviations and submissions waiting for review. Compare like-for-like scopes and plan versions. A change in the number of checks or the local assortment can change the score without proving that execution improved.
Use sales or availability data separately when evaluating the commercial effect. A better compliance score alone does not establish that a reset caused a sales increase.
Keep execution visible across locations
A planogram file describes the intended shelf. Store teams also need an owner for the work, a place to submit evidence and a record of what remains unresolved.
Bitreport supports that operational follow-up through store tasks, checklists, photos and comments. An area manager can review findings and assigned work across locations. Its role in this process is execution and follow-up; the category team’s approved plan remains the reference.
The existing Bitreport grocery solution also illustrates how teams can record shelf-related issues with photos, including price and label discrepancies. Keep those issue types distinct from the planogram result so the right team receives the work.

Start with one category reset across a small group of stores. Check whether associates can find the right reference, whether photos answer the reviewer’s questions and whether unresolved issues reach an owner. Adjust those steps before extending the process across every aisle. Our guide to the retail store reset covers the countdown, the store packet and the go-back for a pilot like that.
To see how the follow-up would work, bring one shelf plan and a typical store exception to a 30-minute Bitreport demo. Walk through assignment, evidence, correction and review using the work your team already needs to complete.