

A promotion is scheduled to start Friday morning. Marketing has approved the artwork, the offer is configured, and every store has received the brief. At opening, one location still has last week’s signs, another is missing the featured product, and a third charges the regular price at checkout.
Promotion execution in retail is the work of turning an approved campaign into the correct customer experience in each participating store. It covers stock readiness, prices, signage, displays, staff instructions, launch checks, corrections, and removal when the offer ends.
For a multi-location retailer, the useful question is not just “Did we send the campaign?” It is “Which stores are ready, what proves it, and who is fixing the exceptions?” This guide gives you a process, a worked launch schedule, and checks you can adapt to your next promotion.
What good promotion execution includes
Promotion planning defines the offer, audience, products, commercial objective, and campaign period. Execution puts those decisions into practice on the shop floor. Promotion measurement then examines both whether the campaign ran correctly and whether it delivered the intended commercial result.
These responsibilities connect, but one does not prove another. A store can install every sign correctly and still sell less than expected. Strong sales can also hide a checkout error or an offer that launched late in several locations.
Within your broader retail operations, give every campaign five things: an approved brief, named owners, store-level deadlines, evidence requirements, and a route for handling problems. Include an end date and removal instructions before the first task goes out.
A useful definition of retail campaign compliance is whether each participating store meets the campaign’s agreed execution requirements. Here, “compliance” means conformance to your brief; it does not certify that the promotion meets every local legal requirement.
Build one campaign brief that stores can use
A store manager should be able to find the applicable instructions without searching through a launch presentation, a message thread, and several versions of a poster. Keep a single approved version with a clear revision date. Put exceptions next to the instruction they change.
Start with the shopper’s experience. Which product qualifies? Where will the customer see it? What price or offer should apply? What should an associate say if the featured item is unavailable?
For each campaign, document:
Offer and scope: eligible products, exclusions, customer conditions, participating stores, start/end time, and applicable time zone.
Display instructions: approved artwork, sign sizes, display location, reference images, and permitted variations by store format.
Stock and replenishment: required assortment, initial readiness check, replenishment owner, and the response to a shortage.
Checkout verification: who configures the offer, who tests it in store, which qualifying and nonqualifying purchases to check, and where results are recorded.
Team briefing: the offer explanation, likely customer questions, shift-handover instructions, and the person who answers unresolved questions.
Evidence and review: required photos or check results, submission deadline, reviewer, correction deadline, and launch-blocking conditions.
Changeover: removal deadline, materials to retain or discard, and the next display or price state.
Avoid instructions such as “merchandise as usual.” A small-format store needs an approved alternative when the reference display requires a fixture it does not have. For apparel-specific examples of adapting display standards, see our fashion retail visual merchandising guide.
Once execution starts, treat changes as new instructions. Identify the affected locations, explain what changed, and require confirmation of the revised action. A new file in a shared folder is not evidence that the old sign has been replaced.
Use a launch schedule with clear handoffs
Work backward from the moment customers can buy the offer. Leave enough time between store submission and launch for someone to review evidence and return corrections. A photo deadline at opening time leaves no correction window.
Shopify’s sales preparation guidance also emphasizes advance preparation for seasonal sales and the operational pressure increased demand can place on inventory and fulfillment. Your exact lead time will depend on printing, delivery, staffing, and offer complexity.
The following schedule is a starting point for an ordinary store campaign, not an industry standard. Longer production or delivery times require an earlier start.
| Phase | Suggested timing | Accountable role | Evidence or decision |
|---|---|---|---|
| Approve the brief | Before materials are produced | Campaign owner | Final offer, store scope, artwork, and permitted variations |
| Check readiness | Several days before launch | Store manager, with stock and pricing owners | Materials received, assortment checked, unresolved blockers assigned |
| Install and test | Before opening on launch day, or earlier where appropriate | Store team and pricing/POS owner | Display photos and recorded checkout checks |
| Review and release | Before the local launch deadline | Regional manager or campaign reviewer | Verified ready, correction required, or blocked |
| Maintain the campaign | During the offer, at agreed checks | Store manager | Replenishment, sign condition, new issues, and shift briefing |
| Remove and review | At campaign end and afterward | Store manager, then campaign owner | Old offer removed, checkout rechecked, results and issues reviewed |
Separate accountability from the person doing every task. The store manager may own readiness, while an associate installs signs and the central pricing team fixes a checkout rule. A regional manager can coordinate the decision without becoming the default owner of every problem.
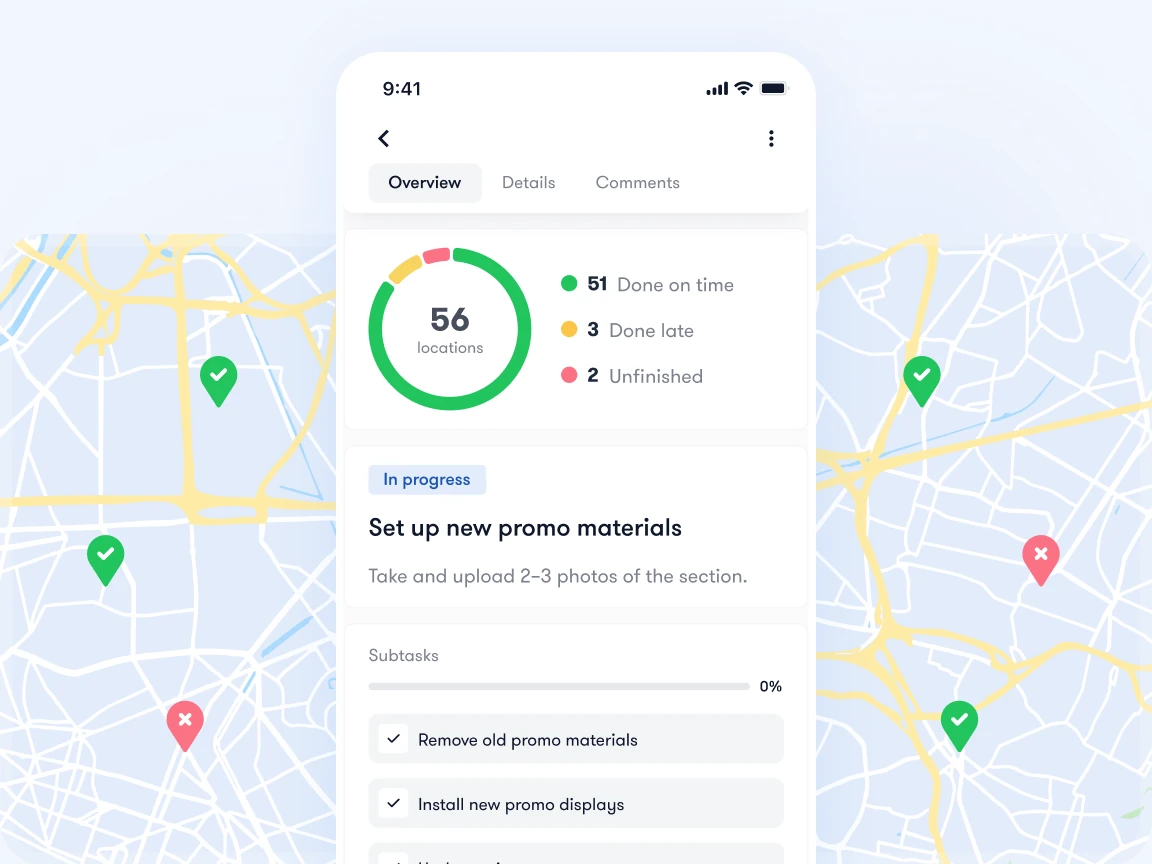
Verify the store before calling it ready
“Done” can mean that someone read the brief, installed the display, or submitted a photo. Define exactly what your launch status means. Use verified ready only when the checks required for that store have passed and the required evidence has been reviewed.
A practical launch gate can use these six checks:
Confirm the correct campaign. Check the brief version, store eligibility, dates, and approved local variation. Remove superseded instructions from the team’s working view.
Check product availability. Confirm the promoted assortment is present and accessible to customers, with a named replenishment owner. Record shortages instead of substituting unrelated products without approval.
Inspect every customer-facing message. Compare windows, fixtures, shelf labels, checkout signs, and applicable in-store screens against the approved offer. Remove conflicting material.
Test the checkout result. Follow your approved test procedure for qualifying purchases, exclusions, and relevant offer combinations. Record the expected and actual result; involve the pricing owner if they differ.
Brief the team. Have the responsible associate explain the offer and its main conditions back to the manager. Include later shifts so the launch briefing does not stop with the opening team.
Review evidence and exceptions. Confirm the required photos and test results, resolve critical gaps, and record the readiness decision with an owner and time.
A photo of a shelf ticket proves what the ticket says at that moment. It does not prove what the checkout will charge. Likewise, a screenshot of an inventory balance does not establish that a shopper can find the item on the fixture. Choose evidence that answers the actual check.
For display presentation, use the relevant checks from the visual merchandising audit checklist. Keep the campaign launch gate focused on the current promotion rather than repeating a full store audit.
What should block a launch?
Agree the rules before launch day. A wrong checkout price, unavailable essential product, or misleading sign may require the affected offer to be held back while the responsible owner resolves the issue. Follow your company’s approved customer and pricing procedures; a store team should not improvise a discount to make the checklist pass.
Smaller presentation issues can have a different correction deadline when the campaign owner permits it. Record the exception, approver, affected locations, and expiry. An approved variation should remain visible as a variation, rather than being silently treated as identical execution.
A missed submission deadline means readiness is unknown. Keep it separate from a confirmed failure and from a verified pass. That distinction makes follow-up more useful: one store needs evidence, another needs a physical fix.
Example: a weekend promotion across 24 stores
Consider a fictional homewares retailer promoting selected coffee cups and plates over a weekend. The offer is already commercially approved. Twenty stores use the standard central display; four compact stores use an approved counter arrangement.
The campaign owner sets a Friday opening launch and a Sunday closing finish, using each store’s local time. Stores receive one brief with both display formats, eligible product codes, artwork, offer conditions, and a removal task. The rollout might look like this:
| Checkpoint | Store action | Review or escalation |
|---|---|---|
| Tuesday afternoon | Confirm materials received and check participating products | Missing deliveries go to the logistics owner; stores do not mark readiness complete |
| Thursday afternoon | Prepare the display where possible and report remaining blockers | Reviewer checks the correct format and requests specific corrections |
| Friday before opening | Finish setup, verify the checkout offer, and brief the opening team | Regional manager confirms which stores are ready for their local opening |
| During the weekend | Check presentation and availability during normal floor walks | Shortages and damaged signs receive named owners and new deadlines |
| Sunday closing / next opening | Remove the offer at its approved end and verify the replacement state | Manager records removal evidence and the required checkout recheck |
Suppose one compact store receives the wrong sign size. Its manager reports the issue Thursday, attaches a photo, and requests the approved compact artwork. Marketing supplies the right file; the store replaces the sign and submits a new photo. The reviewer closes that correction only after checking the replacement.
Another location reports that the checkout does not apply the approved offer. That issue goes to the pricing/POS owner, with the product and transaction details needed to reproduce it. The campaign owner decides how that location should proceed under the agreed rules. Installing the display does not make the store ready while the checkout issue remains unresolved.
All numbers and timings in this example are illustrative. The value is the sequence: identify the gap, assign the right owner, resolve it, verify the correction, then update readiness.
Keep photo review and corrections connected
Ask for a small, purposeful evidence set: an overview showing the display’s location, a closer view of the offer message, and any campaign-specific detail that matters. State the required views in advance so stores do not submit a polished close-up that hides an incomplete display.
Keep the store, campaign, brief version, and submission time with the evidence. Avoid including customers, payment information, or other personal details in photos and test records. When something is wrong, describe the physical change needed: “Replace the expired offer card on the left of the display” is more actionable than “Please fix VM.”
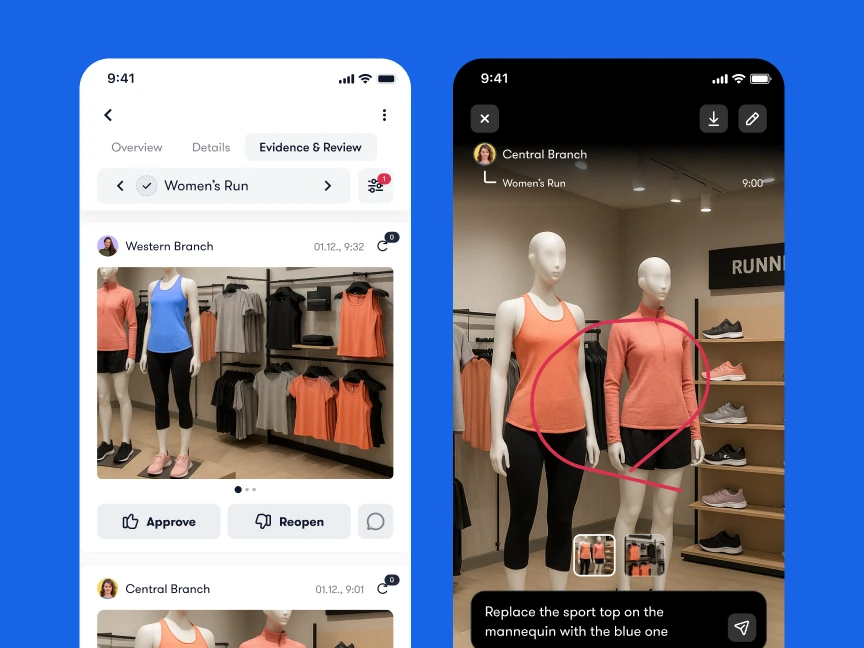
In Bitreport’s manual photo verification workflow, a reviewer can mark up the image and write feedback; the store receives that feedback in real time and resubmits until the work passes review. This is a human review process. The screenshot shows a merchandising correction, illustrating how specific feedback stays attached to the visual evidence.
Set a realistic review workload. If all stores submit shortly before opening, make sure reviewers have time to check them. Sample-based review can reduce workload, but report the sample honestly: checking ten stores does not establish that every location passed.
Measure readiness separately from sales results
Start with a few measures that tell the operations team what to do next. Define participating stores and the readiness deadline before launch. Preserve that denominator when problems occur; removing a late store from the list would make the result look better without improving execution.
On-time verified readiness = participating stores verified ready by their deadline ÷ all participating stores scheduled to launch × 100
In the fictional 24-store campaign, if 21 locations pass before their deadlines, on-time verified readiness is 87.5%. If two more pass later, keep the original launch figure and report the later recovery separately. It answers a different question.
Also track the number of blocked stores, stores still awaiting review, and open critical issues. For corrections, measure the time from issue creation to verified closure, and keep unresolved issues visible beside the closed-case figures. A fast average for easy fixes can hide a serious issue still waiting for an owner.
Check removal on time as well. A campaign is not operationally finished until expired materials and offer settings have been dealt with according to the brief.
Commercial performance needs separate analysis. NIQ’s promotion measurement approach uses transaction, sales, and loyalty data to examine customer behavior and incremental impact. Execution records add context about which stores actually ran the planned offer, but do not establish that the promotion caused a sales increase.
Compare sales and margin against an appropriate baseline, accounting for factors such as availability, seasonality, and other campaigns. Your retail store analytics process should keep operational readiness and commercial outcomes distinguishable, so the team can investigate rather than assume.
Put the next campaign into one execution workflow
Choose an upcoming promotion and define the launch gate before sending assignments. Give stores the applicable instructions, deadlines, required proof, and the person to contact when they cannot comply. Schedule removal at the same time as installation.
Bitreport’s promotion execution workflow supports assigning campaign tasks with visuals and deadlines, collecting store photos, and tracking completion across locations. Its task management tools give teams a place to keep instructions, execution status, and follow-up work together. Pricing configuration, inventory allocation, and commercial analysis remain responsibilities of their respective systems and owners.
When evaluating a tool, bring one real brief and one awkward exception: a missing delivery, a compact-store layout, or a failed checkout check. Ask to follow the work from assignment through evidence, review, correction, and closure. Our retail execution software guide can help you compare the wider workflow fit.
To explore that process in Bitreport, book a demo with your next campaign in mind.